
For several years, the trend of “naturalness” has been maintained in makeup with arrows. The most suitable are classic and feathered arrows. But multi-colored, double, graphic and other various arrows do not lose popularity.
- Who are the arrows in front of?
- The main types of arrows for eye makeup
- Basic
- Long
- half
- With two ponytails
- airplane wing
- Wide
- Arabic
- Cat arrow (cat eye)
- Graphic arrows
- Feathered arrows
- Art arrows
- Ombre arrows
- Super thin hands
- Arrow dots
- tattoo
- What tools can be used to draw beautiful arrows?
- Eyeliner-marker
- liquid eyeliner
- Pencil and kajal
- Shadows
- Stamps (ready-made stamps-markers in the form of arrows)
- Stencil application
- Makeup with arrows depending on the shape of the eyes
- Round
- narrow (small)
- Wide set
- close set
- With folded corners
- Almond-shaped
- Makeup with arrows depending on their color
- Brown and black
- Gray and blue
- Green
- How to do eye makeup with arrows and shadows?
- Casual daytime
- festive evening
- Arrow Makeup Ideas
- Evening eye makeup with arrows
- Smokey Eyes Arrow Eye Makeup
- Everyday makeup
- Festive option
- Photo selection of interesting options
Who are the arrows in front of?
This element of makeup is suitable for absolutely any girl, because in our time there are no taboos that prohibit making arrows. The main thing is to choose the right arrow option for you.
The main types of arrows for eye makeup
Before analyzing the most interesting and creative methods, it is worthwhile to study the basic types of arrows, the technique for their implementation, and the products that can be used to do this.
Basic
Classic arrows are the foundation of the basics. Many female representatives try to learn how to draw at least them, but this does not always work out successfully. Let’s analyze in detail the technique of drawing ordinary arrows (performed in a dark color, usually black):
- Draw a line from the outer corner of the eye – the “tail”, which will be a continuation of your eye.
- Draw another line from the end of this line, which will return to the eyelid, so you will make the arrow thicker.
- Next, emphasize the eyelid by drawing a line along its contour.
- Color the entire area of the arrow with color.
A photo instruction is also attached for a more understandable and detailed analysis: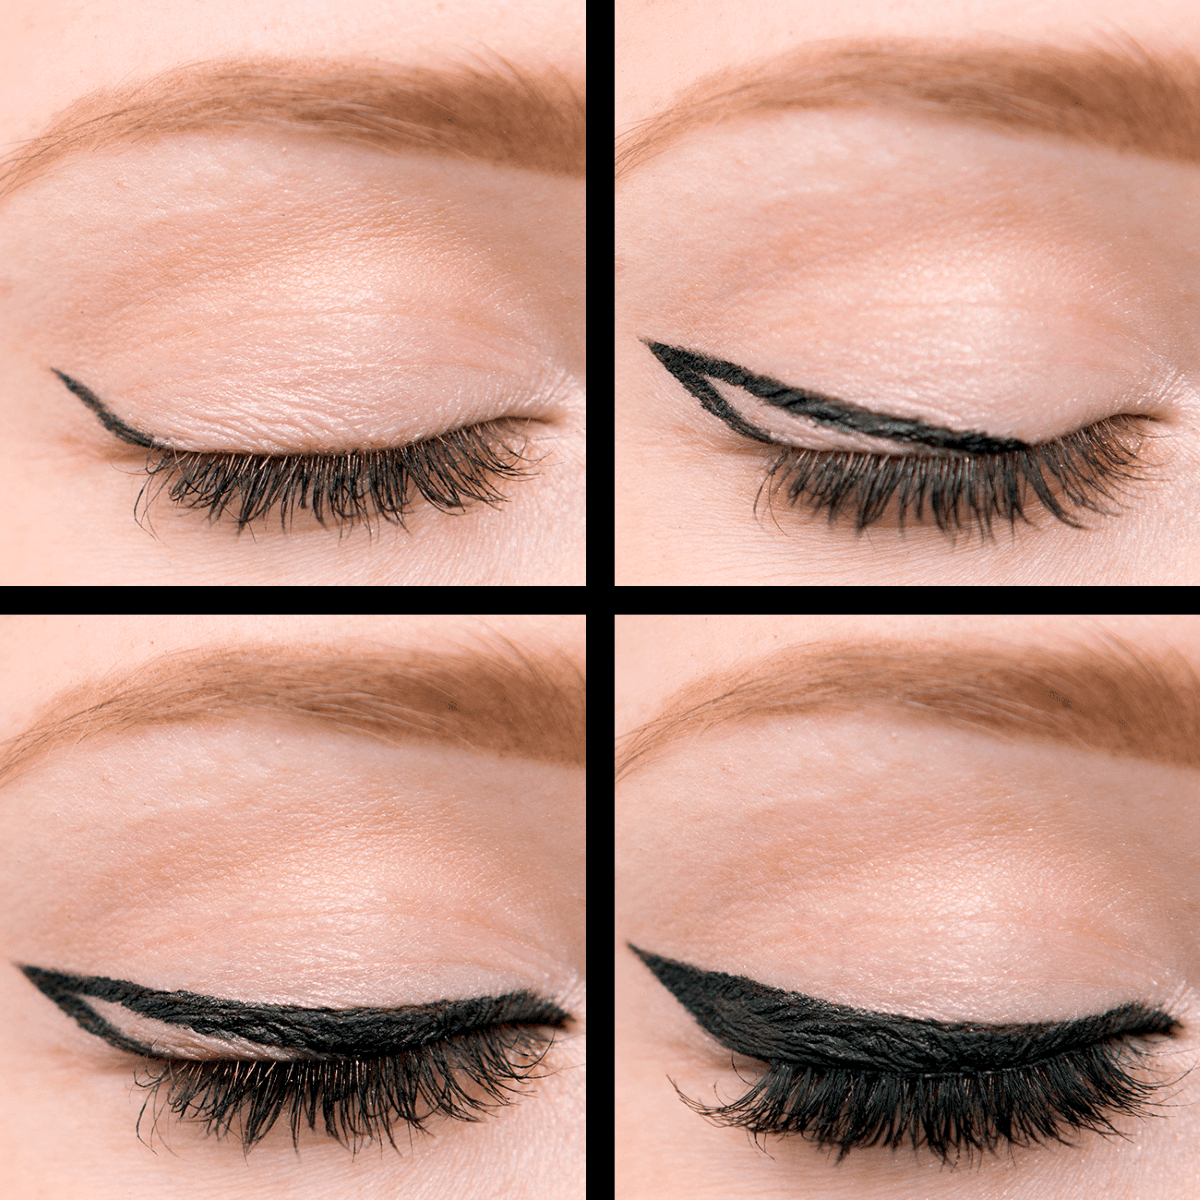
Long
Long arrows can make your look more expressive. This technique can help make the eye visually narrower. This option may seem more difficult than the first, but in fact it is not difficult at all:
- First, paint over the space between the eyelashes and the line of the eyelid – this way you can set the basis for a long arrow.
- Then draw a line from the corner of the eyes, more horizontal than in the first case (it can be almost straight).
- Next, make the arrow thicker as desired, adjust its shape.
Or you can repeat all the steps from the first instruction, but increase the length of the arrow to the desired one: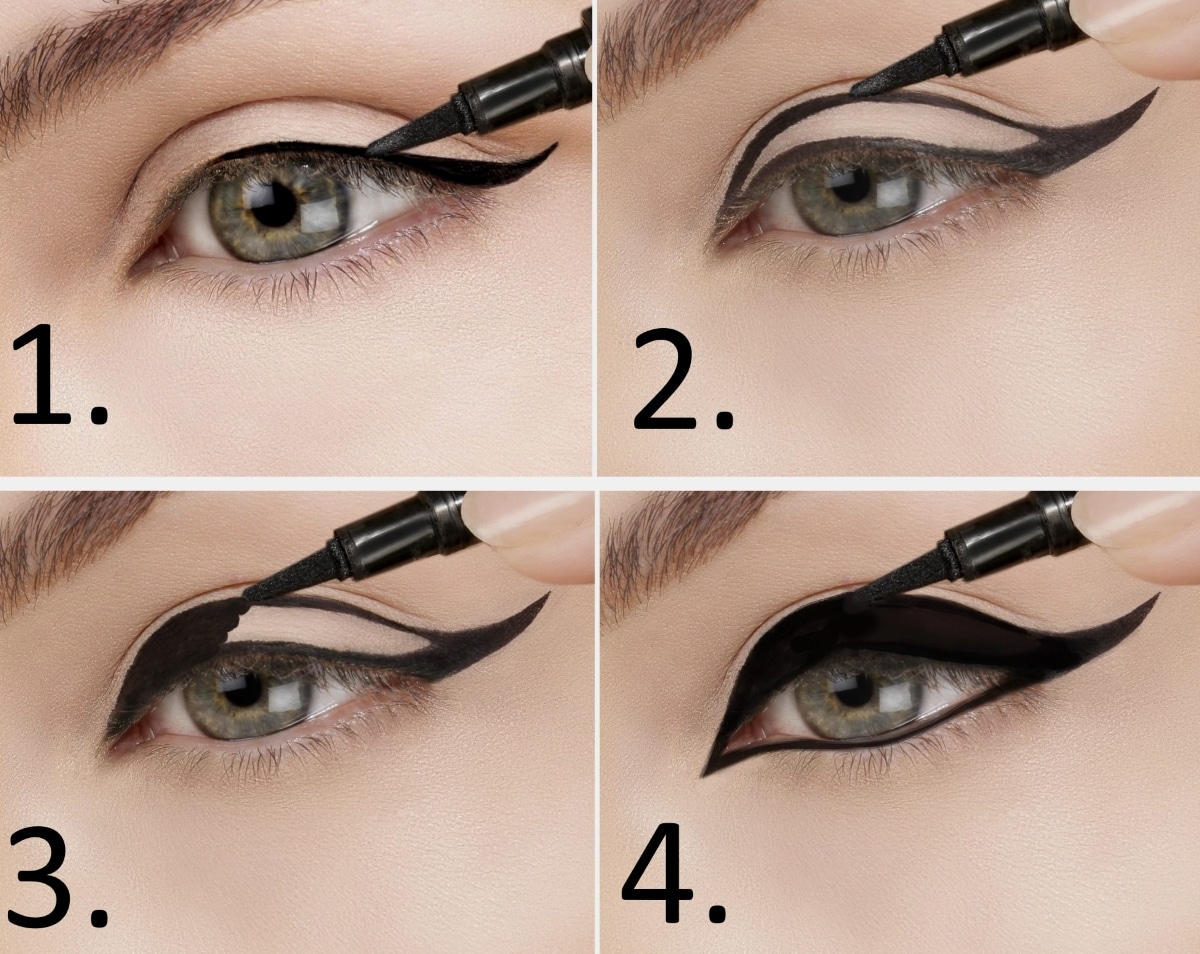
half
This type differs from the previous ones in that the base of the arrow does not begin in the inner corner of the eye, but approximately in the middle of the eyelid. This type is also called “arrows-corners”. Their implementation is also not difficult:
- First, paint over the contour of that half of the eyelid, on which there will still be an arrow.
- Then draw a classic arrow.
- Paint over the entire area.
What the arrows look like in the final version: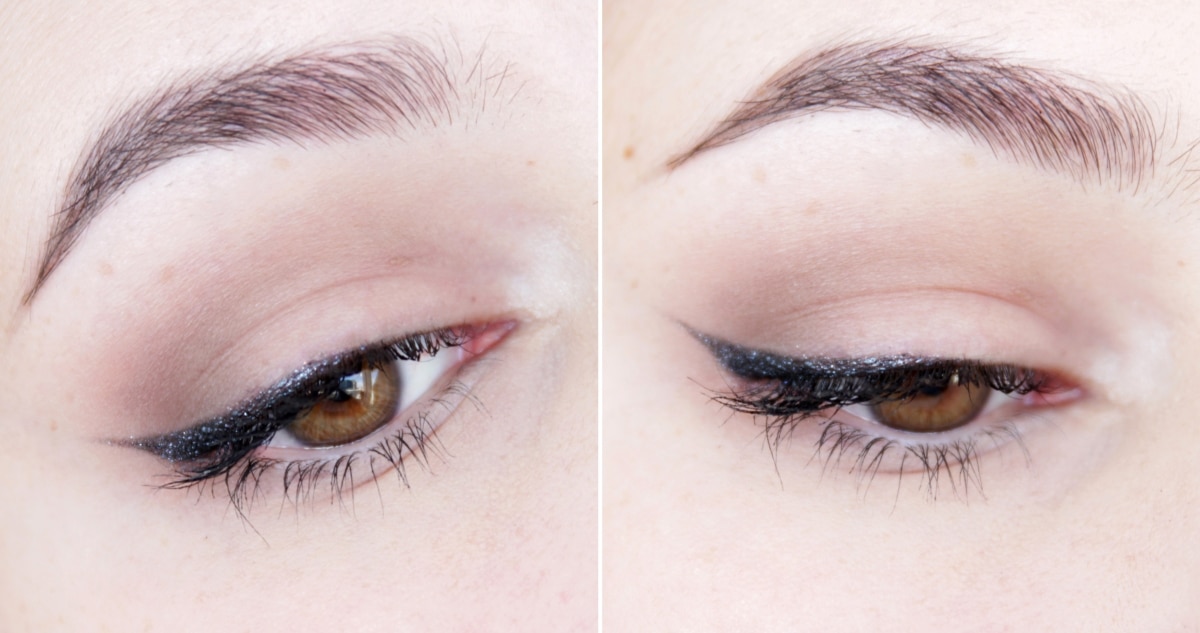
With two ponytails
Such an arrow will look more creative on the eyelid, you can emphasize the lash line. The execution scheme is already more different from the others:
- For all stages, draw a classic arrow.
- Draw a corner that starts at the end of the arrow.
- Draw a rounded line along the fixed eyelid, but do not close.
Photo instruction: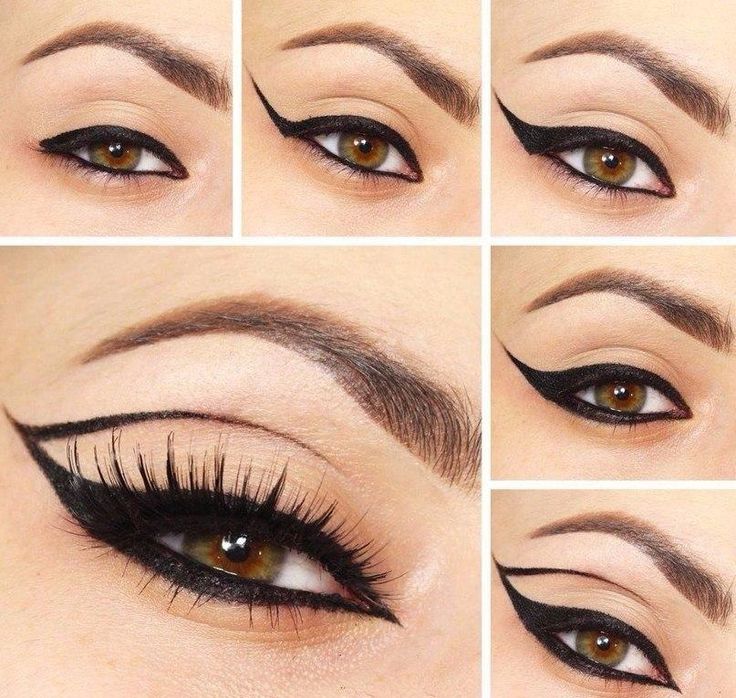
- Make an outline of the arrow from the middle of the lower eyelid so that the tip “looks” down.
- Color the entire area.
Step-by-step instruction: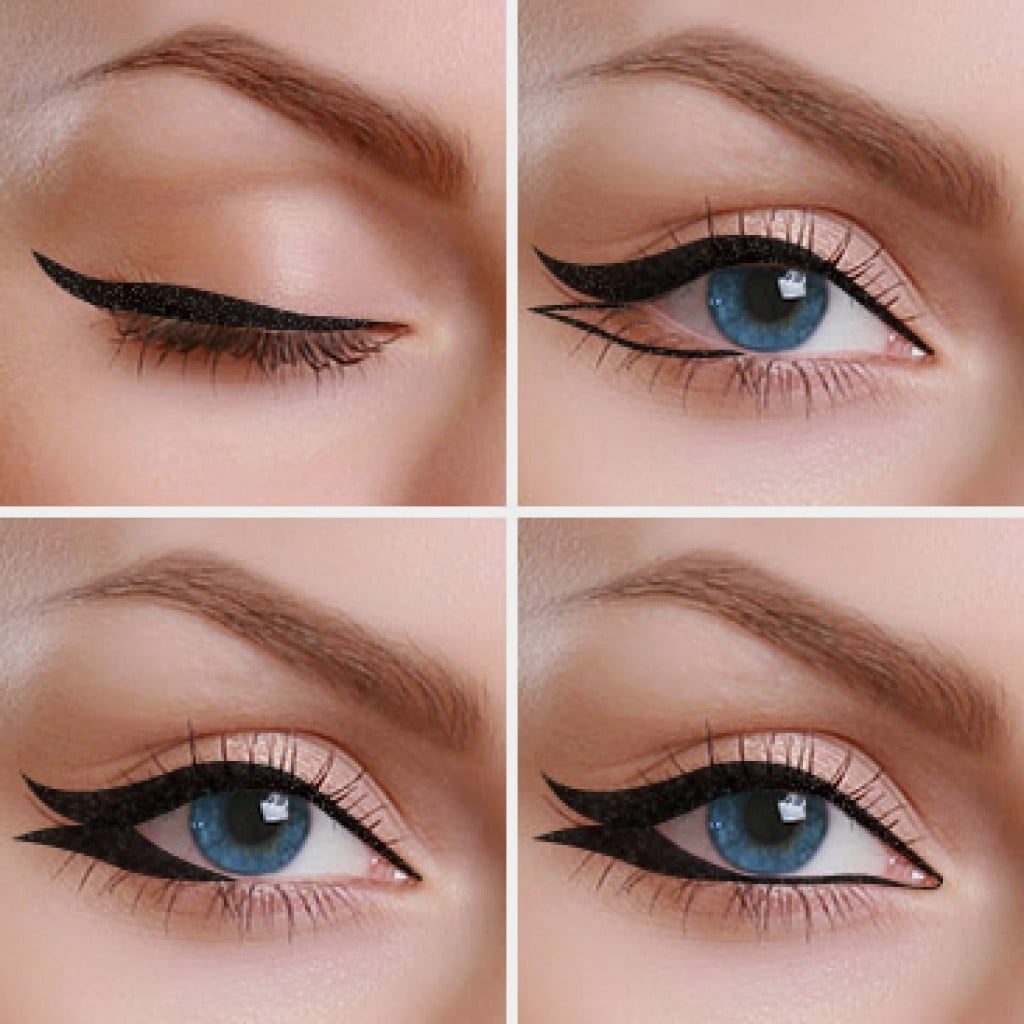
airplane wing
This arrow really looks like an airplane wing. But its peculiarity lies in the fact that it is perfect for girls with impending eyelids. The main nuance of such an arrow is the severity of the arrow itself: its thickness is twice the thickness of the line on the eyelid. Draw it like this:
- Outline the arrow itself.
- Paint over the upper eyelid without painting over the arrow.
- Paint over the main part of the arrow, leaving it above the contour of the eyelid.
Below is the instruction: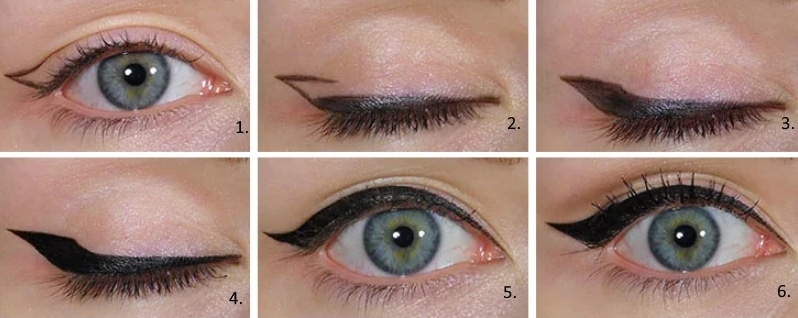
Wide
This type is called wide precisely because it occupies almost the entire moving eyelid. The principle of execution of a wide arrow is not very different from the lightest ones:
- It is necessary to draw the line of the eyelid and the outline of the arrow in the classical way.
- Then from the outer corner and along the entire length of the eyelid, increase the thickness of the line to the desired one.
- Colorize.
Video instruction is attached below: https://youtu.be/ipbxqcIHhgk
Arabic
This type of arrows has been chosen by many fashion houses for many years, since it is the Arab ones that help to make the eyes the center of makeup. Such arrows are unusual in that the entire contour of the eye is outlined, and the arrow itself is not such an important component. To perform the Arabic arrow, you must adhere to the following steps:
- Paint with a special pencil the entire mucous membrane of the eye (upper, lower eyelid and interciliary space).
- Draw a thin arrow along the entire upper eyelid and continue a little.
- Go over the lower eyelid again for a brighter effect.
How to draw an Arab shooter, the video will tell about this: https://youtu.be/-b5l-ZrZUco
Cat arrow (cat eye)
This arrow is a bit similar to the Arabic, as the emphasis is on the contour of the eye. But the cat eye is performed a little differently, since the lower eyelid is not brought down:
- Accentuate the upper eyelid with a pencil or eyeliner.
- Draw a classic or slightly thinner arrow.
- On the inner corner of the eye, make a small arrow, which will be a continuation of the main one.
Video instruction: https://youtu.be/RhzgTHtyMHM
Graphic arrows
This type of arrows is quite diverse, because there is a huge selection of different techniques. The main thing is that all the lines of your arrows are clear and even. Consider one of the options:
- Draw a classic arrow.
- From the tip, draw a contour along the entire motionless eyelid to the inner corner of the eye.
- Draw another arrow coming out of the main line.
- Outline the motionless eyelid, but in any other place.
In this video you can see how to draw graphical arrows made up of various straight lines. https://youtu.be/syDYUj40TqE
Feathered arrows
The feathered arrow is one of the options for light everyday makeup, as it almost merges with the eye contour. Usually this type is performed with shadows or in combination: the main contour is eyeliner, shading is shadows. Usually the outline of such an arrow is much thinner than the classic one:
- Shadows make a contour of the moving eyelid.
- Draw a thin arrow.
- Take a fluffy eyeshadow brush and blend the arrow itself so that the contour merges with the eyelid.
- Repeat the previous points again if necessary.
In the attached video, you can look at several techniques for making feathered arrows that will facilitate your makeup process. https://youtu.be/sg10Qhb-Q4U
Art arrows
Graphic arrows can also be classified as art arrows, but for the most part these are arrows made in an atypical color for them (red, blue, white, etc.). The presence of various elements is also allowed: flowers, animals, cartoon characters, etc. The arrow, simply made in a different color, may seem the simplest:
- Take a pencil or eyeliner of any color.
- Draw a classic arrow.
- Emphasize the lower eyelid with the same color.
- Draw an arrow in the inner corner of the eye.
- Draw a dot under the lower eyelid with a different color.
Photo instruction: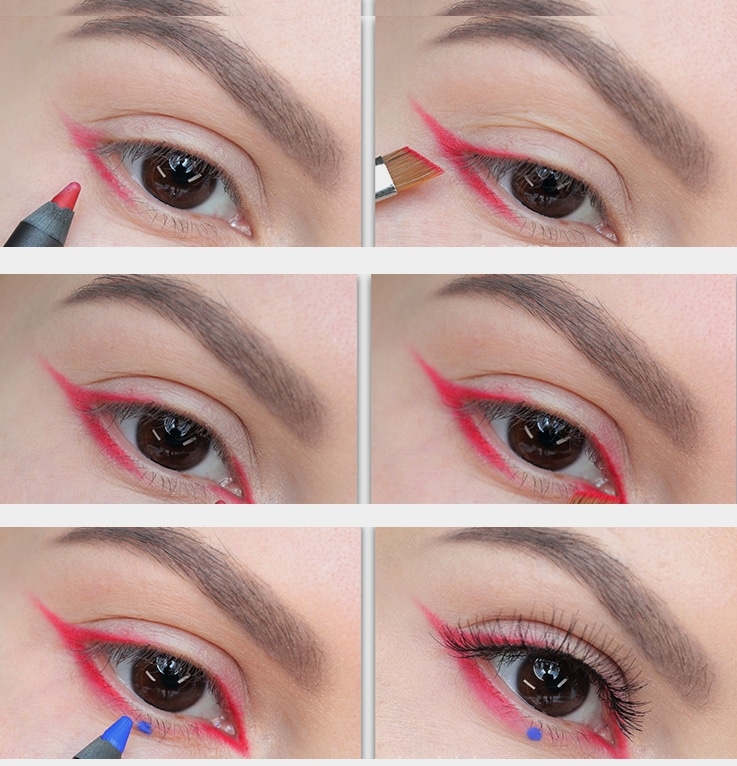
Ombre arrows
This view can also be attributed to the art section, but here attention is not always switched to the color of the arrow, but on it there is a gradient, the transition from one color to another, from light to dark, etc. Such arrows are performed according to the following scheme:
- Outline the darkest part of the arrow.
- Continue to paint with an intermediate color already along the moving eyelid.
- Finish with the lightest at the corner of the eye.
Step by step photo instructions are attached below: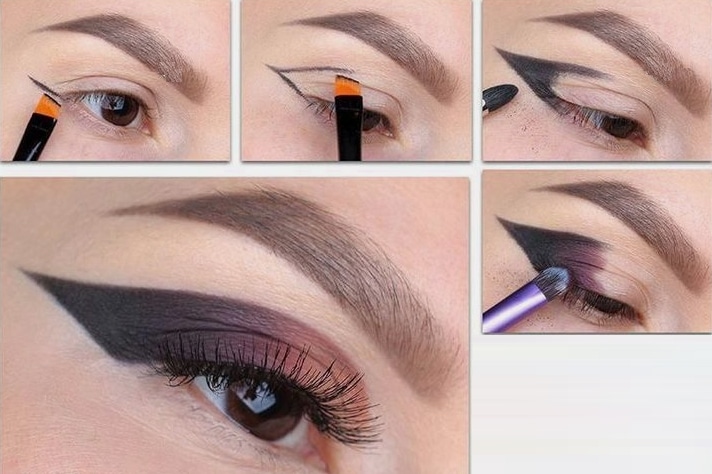
Super thin hands
This type of makeup can also be attributed to everyday, as it is quite invisible. A thin arrow will complement a full-fledged make-up, emphasize the ciliary line.
- Underline the eyelash line with a very thin line.
- Draw a line from the outer corner, as in the classic arrow.
- Do not make an outline, as the arrow should be thin.
The following video details the thin arrow technique: https://youtu.be/RDTLlFZXOcs
Arrow dots
Dots are a fairly new trend in arrow drawing. They can become both an addition to a classic or graphic arrow, and a full-fledged arrow. Let’s take a closer look at the second option:
- Mark with a light pencil or shadows the outline of the arrow you want to get.
- Dot the entire length or area of the arrow, there are no rules.
- Fill in all the space you want.
Instruction: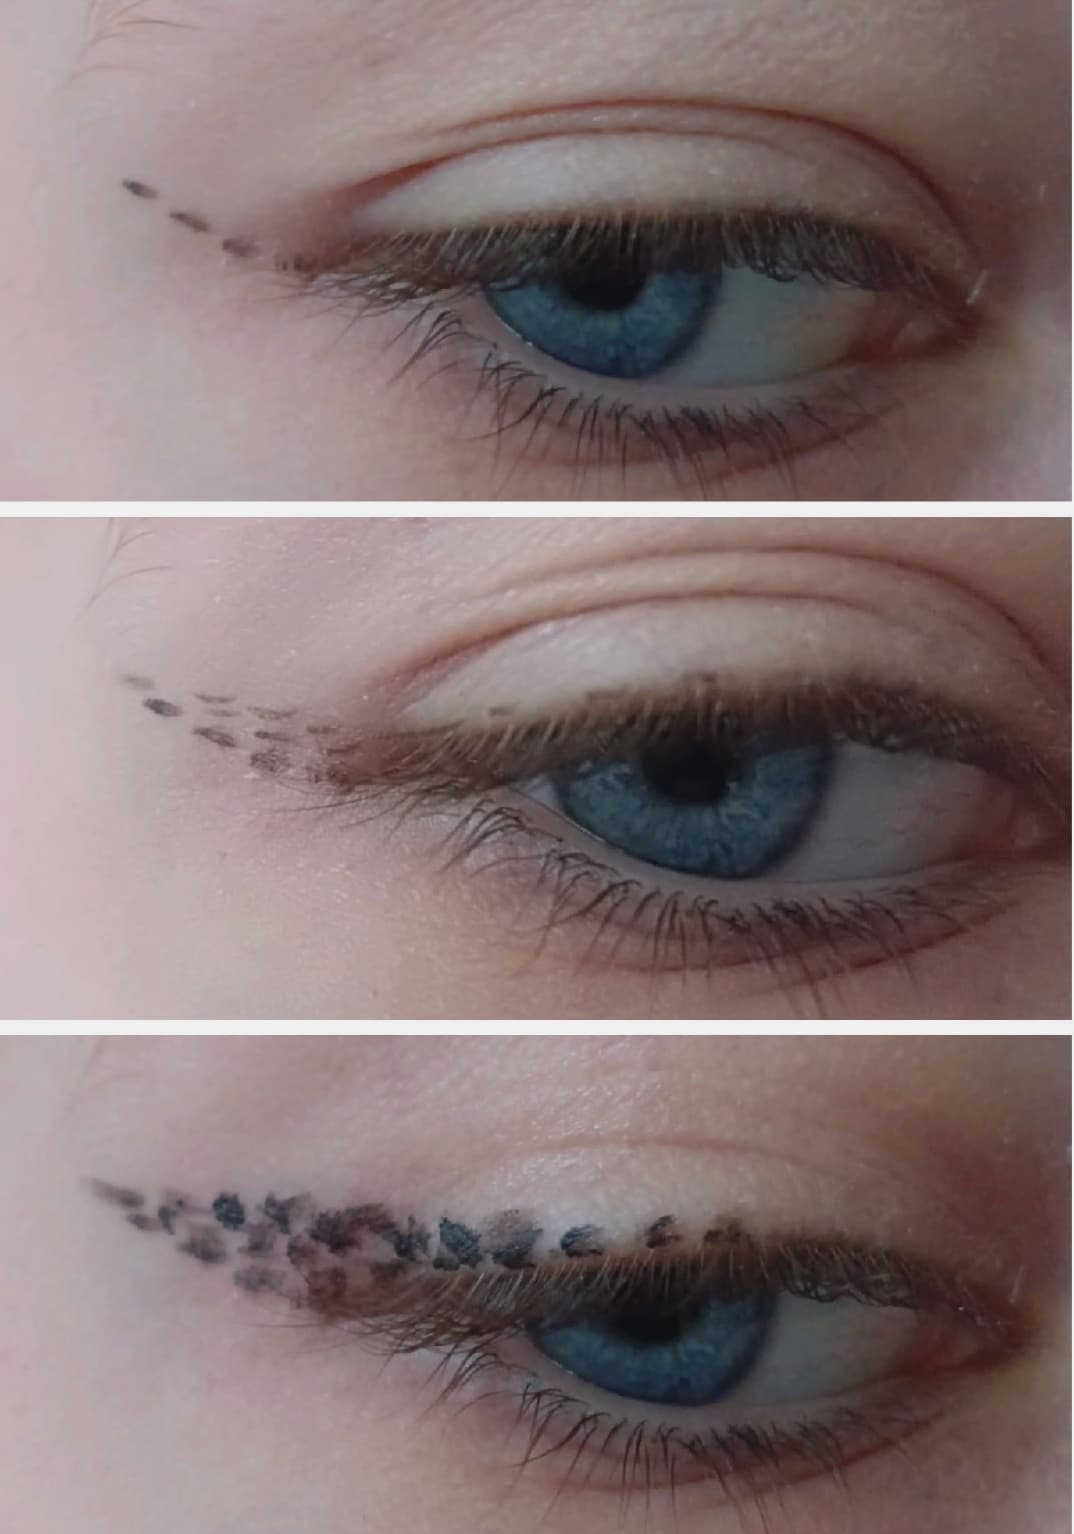
tattoo
But if you still don’t want to waste your time on drawing arrows, you can do it differently – make a tattoo of arrows (permanent makeup), which is impossible to do on your own, only in specialized salons. This procedure is not very expensive, but the result will remain with you for many years. Consider the tattoo procedure in more detail:
- First, a contour is drawn, with a regular eye product.
- The arrow is covered with color, permanent pigment.
- The arrow is feathered with special strokes.
- The work is covered with a special healing ointment.
Arrows can be made brown, black, gray. If necessary, you can tint them with a pencil or eyeliner if you need a brighter make-up. Detailed consultation and analysis here: https://youtu.be/gEERz0BeoN4
What tools can be used to draw beautiful arrows?
Now on the market there is a huge variety of products in order to perform makeup with arrows easily at home. Below we will consider the best options for arrows and the criteria by which you can choose a product for your own use.
Eyeliner-marker
A marker or liner for arrows is a fairly common type of eyeliner. What are the signs to look out for:
- The amount of the product is ambiguous: it may not run out for years or dry out after a couple of days, despite the large amount of ml.
- The tip of the eyeliner is felt or plastic; it can wear out with inaccurate use.
- Draws quite clearly, but you need to get used to it.
- It is comfortable to hold like a pen.
- With a long downward tilt, the product stops flowing to the tip.
It is impossible to speak unambiguously about this product, as some are delighted with it, while others are dissatisfied on the contrary.
liquid eyeliner
Such a product is in a kind of jar with a screw cap with a long handle, which later serves as a brush for you. This eyeliner receives more positive reviews, because:
- Doesn’t dry out for a long time.
- If the brush runs out of product, you can immediately take more.
- The lines are much thinner than with a marker.
- The brush is usually shorter and stronger, even if made of felt.
Pencil and kajal
Eye products such as pencil and kajal cannot be called complete in order to draw an arrow. They are considered auxiliary, since they can:
- Draw the outline of the arrow.
- Paint over the interstitial space.
- Emphasize the lower eyelid when performing some arrows.
But still, it is possible to draw an arrow with a pencil, only the result will not be so bright, a method with shading is possible.
Shadows
The eyeshadows are a great base for the feathered liner, ombre liner, and color options. The benefits include:
- The shadows blend well and blend into the skin.
- You can get both delicate makeup and neon-bright.
- A variety of colors compared to eyeliners.
But still there is one drawback: if you do not properly prepare the eyelid for makeup, the shadows can crumble, roll, lose their original shade.
Stamps (ready-made stamps-markers in the form of arrows)
In recent years, eye products such as arrow stamps have begun to appear on the market. They almost completely facilitate the execution of any arrow, as they set its main component. This is the result you can get in a couple of seconds:
Stencil application
In addition to stamps, there are also stencils for arrows, which can already be found in any small cosmetics store or on the Internet platform. They are easy enough to use:
- Attach the stencil to the eyelid.
- Circle the outline.
- Fill with color the area of the entire arrow.
But this method may not be convenient for everyone, so it is rarely chosen.
Makeup with arrows depending on the shape of the eyes
For all female representatives, the shape of the eyes and their position are noticeably different, so each should choose eye makeup and arrows for their type. Next, we will consider the most common forms and positions of the eyes, in which there are problems with the selection of the arrow.
Round
Round eyes and the truth in shape almost repeat an even circle. There are two options for correct makeup:
- Execution of a cat eye to bring the shape of the eye closer to the almond-shaped, narrow the eye.
- Add drama to the image, even more “round” the eye – work out the interlash and both eyelids with any pencil or kajal.

narrow (small)
Small eyes also require a special approach. It is very important to comply with several criteria:
- To enlarge and round the eye, you need to use a white or other light pencil for the space between the eyelashes.
- You should not focus on the inner corner of the eye, as the eye visually decreases (that is, you can perform a cat eye, but defective).
Wide set
A sign of wide-set eyes is a large distance between their inner corners, so the emphasis should be on them. That is:
- It is important to prepare the eyelid well for the arrow, to make a good shape.
- Draw the inner corner carefully (once again cat eye).
close set
In such a situation, another problem is that the distance between the eyes is too small, so the eye itself seems quite small. Therefore, you need to act by the opposite method – to focus on the outer corner of the eye. Everything will depend on:
- Correct sculpture of the century (previously it is worth emphasizing with dark shadows).
- The concentration of the arrow on the outer corner of the eye, and not the inner.
With folded corners
In a situation with lowered corners of the eyes, it is important to “lift” the eyelid and make a certain lifting effect. There are several aspects here:
- Using a light color inside the eye.
- Slightly shaded outer corner.
- The arrow, raised more than the classic.
- It is worth giving preference to a feathered arrow, rather than a clear one.
Almond-shaped
Owners of almond-shaped eyes can safely perform all types of arrows, as their eyes are considered quite “correct”. You can limit yourself to the classic arrow, or vice versa, focus on graphics, make haze, as in the previous case.
Makeup with arrows depending on their color
In makeup, the stereotypes and rules that everyone massively adhere to have long disappeared. Despite this, by the color of the eyes, you can determine which color of the arrow suits their owner more. Naturally, black arrows are a classic option that can be used by everyone.
Brown and black
Owners of brown or black iris are very lucky: this eye color is considered universal, so any color of pencil or eyeliner will look great on the eyelid. But still it is recommended to pay attention to these colors:
- Purple or plum.
- Dark green.
- Emerald.
- And etc.
Gray and blue
For girls with this eye color, the situation is much more complicated, since the shade of the eyes will also depend on the shade of the product. For blue eyes, it is worth choosing eyeliners that contrast with this color, as this adds some brightness to the look.
- Gold.
- Copper.
- Terracotta.
- Caramel.
- And etc.
Even though the eyes themselves are a blue tint, you can use a trick: make dark blue arrows that will brighten up the makeup, making your look deeper due to the color boost. To choose a product for gray eyes, you should rely on what effect you want to achieve. If you want the iris to cast green, it is better to choose these colors:
- Burgundy red.
- Brown.
- Purple or eggplant.
- Amethyst.
If the emphasis should be on the blue tint, then you should give preference to:
- Golden.
- Dark blue.
- Bronze and copper.
Green
In this case, you can also focus on the contrast of the color of the eyes and the arrow. Red is the best color for this, as it is the opposite of green. But in inept hands, the effect may not be the best: it will seem that you have red tired eyes. Therefore, many professional makeup artists advise beginners to first apply black eyeliner as a base, and then red on top. The following shades also harmonize well with green eyes:
- Mahogany.
- Eggplant.
- Brown.
How to do eye makeup with arrows and shadows?
Since the arrow in our time is becoming a fairly important part of the make-up, it is worth knowing several techniques and types of makeup with arrows. Below I will analyze the most basic and simple make-ups that even a beginner can perform.
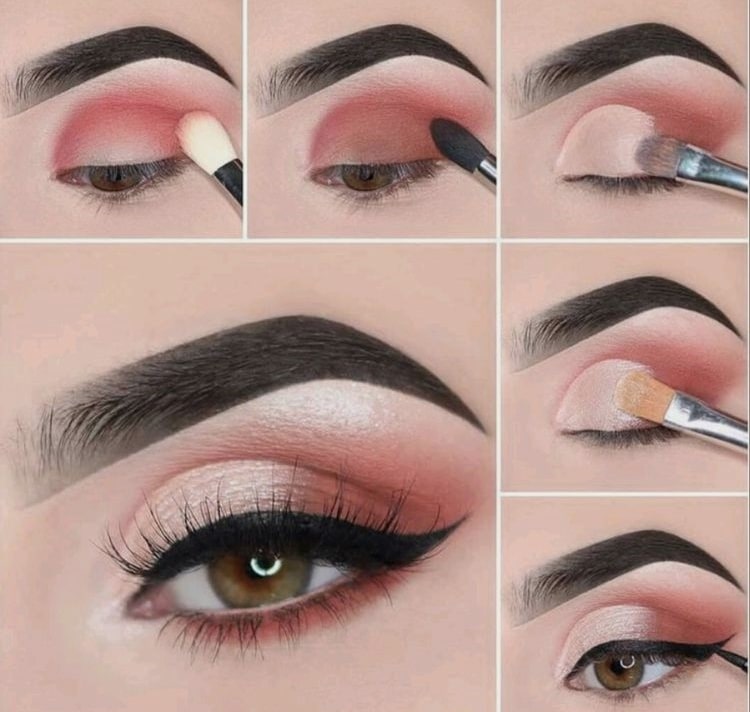
Casual daytime
The main thing in daytime makeup is to refresh, not overload the eyelid. To make the perfect daytime makeup, you should adhere to the following:
- It is better to use light shades of shadows to work out the crease of the eyelid.
- Do not highlight the lower eyelid, especially in black.
- The arrow can be any, but it is better to draw a medium length.
This makeup is done like this:
- With a light brown shade, make a sculpture of a moving eyelid.
- Darken the borders a little, blend.
- Draw a basic arrow.
- Underline the lower eyelid with a white pencil.
- Color your eyelashes.
Video instruction on how to do day makeup: https://youtu.be/NLGGvxQJ6P4
festive evening
This type of makeup is significantly different from the previous one: here you can give free rein to your imagination and experiment. But, if you need to do the correct, just make-up for the festival or any other evening:
- It is important to highlight the look: you can make an Arabic arrow or a cat eye.
- It is logical to focus on the lower eyelid.
- Shades of shadows can be any, but it is better to choose quite dark browns, purples, etc.
How to do evening makeup:
- Sculpture the eyelid with the base color.
- Add shimmery eye shadow or pigment to the lid.
- Draw an Arabic arrow with shadows or eyeliner.
- Underline the lower eyelid with dark shadows, blend.
Video tutorial on evening makeup: https://youtu.be/RjsWOOWFQEY
Arrow Makeup Ideas
There are a huge number of reasons for which a girl can do any kind of makeup, especially with arrows. In addition to the basic options, consider such options as the famous smokey ice and other different types of makeup.
Evening eye makeup with arrows
A good image and makeup is the key to a good mood and a successful evening. Therefore, you need to attribute to the choice of what will be before your eyes. You can experiment: make the crease of the eyelid pink-purple and make a neat feathered arrow.
- With a bright pink color, highlight the border of the moving eyelid, shade it.
- In the center of the eyelid, add light shining shadows.
- With black eyeliner or a pencil, draw a classic arrow.
- Blend, blending with shadows.
- Add pink shadow to the lower eyelid.
- Color your lashes.
More details in the video below: https://youtu.be/CyZWfiXTJjY
Smokey Eyes Arrow Eye Makeup
“Smokey ice” is a technique that is now common, but many girls do not undertake to perform it, as they are afraid of shading the shadows poorly or underworking some detail. To avoid some moments, you can follow these tips:
- It is better to make your first smokey not in black, but for example in brown, pink or gray (for practice).
- To blend the shadows, you should use a dense and high-quality brush.
- Eyeshadow color should be pigmented.
- It is important to prepare the eyelid for makeup: apply a matte primer or concealer of your tone.
Instructions for basic smokey:
- Fill in the crease of the eyelid with the chosen color, making the base.
- Darken the outer corner with shadows, darker than the main color by several shades.
- Blend well.
- Add shimmery shadows to match the moving eyelid.
- Underline the lower eyelid with a dark color of the shadows.
- Draw a classic arrow of medium thickness.
- Color your eyelashes.
Below is a step by step video tutorial on gray Smoky Eyes: https://youtu.be/2tP2unvVaaQ
Everyday makeup
A simple daytime makeup with an arrow will decorate any girl. The best option in order to hide all the flaws and show the virtues can be a well-sculpted eyelid and a beautiful, neat arrow. It is important to follow the same requirements as when making smokey, only the color scheme will be much lighter: beige or pink, light brown shades.
- With a peach or beige arrow, mark the crease of the eyelid.
- Highlight the outer corner of the eye with a darker shade.
- Blend.
- Underline the lower eyelid with the color of the fold.
- Draw a basic arrow of the desired thickness.
- Glue on or tint your lashes.
A detailed tutorial on everyday makeup with arrows: https://youtu.be/AbuQSL1VCHI
Festive option
Festive makeup, like evening makeup, is usually performed in brighter and deeper colors, so makeup with a double long cat eye and rich gold and brown shadows can be an excellent option:
- Sculpture the eyelid with a dark brown color.
- Blend closer to the eyebrows.
- Fill the moving eyelid with golden shadows, do not mix with brown.
- Make a cat eye.
- Draw a contour on the border of brown and gold: this will be the second arrow.
- Color the bottom border again with black.
- Add eyelashes.
https://youtu.be/abEPbyM7rg8
Photo selection of interesting options
There are a lot of makeups with a variety of types of arrows, so it is impossible to describe them all at once. Below are various make-up photos with different types of arrows that were described above for your inspiration and creativity:


